We get questions about importing contributions fairly often, so we thought we’d walk you through the steps we typically follow to ensure that the contributions are a) imported correctly and b) attached to the correct contacts. Does it take a bit longer? Perhaps – but we believe accuracy is well worth the few extra steps.
One important note: for contribution, membership, activity, and participant imports, Civi won’t add any of these to contacts that don’t already exist in the system, so it’s crucial to do a first pass to ensure the contacts exist.
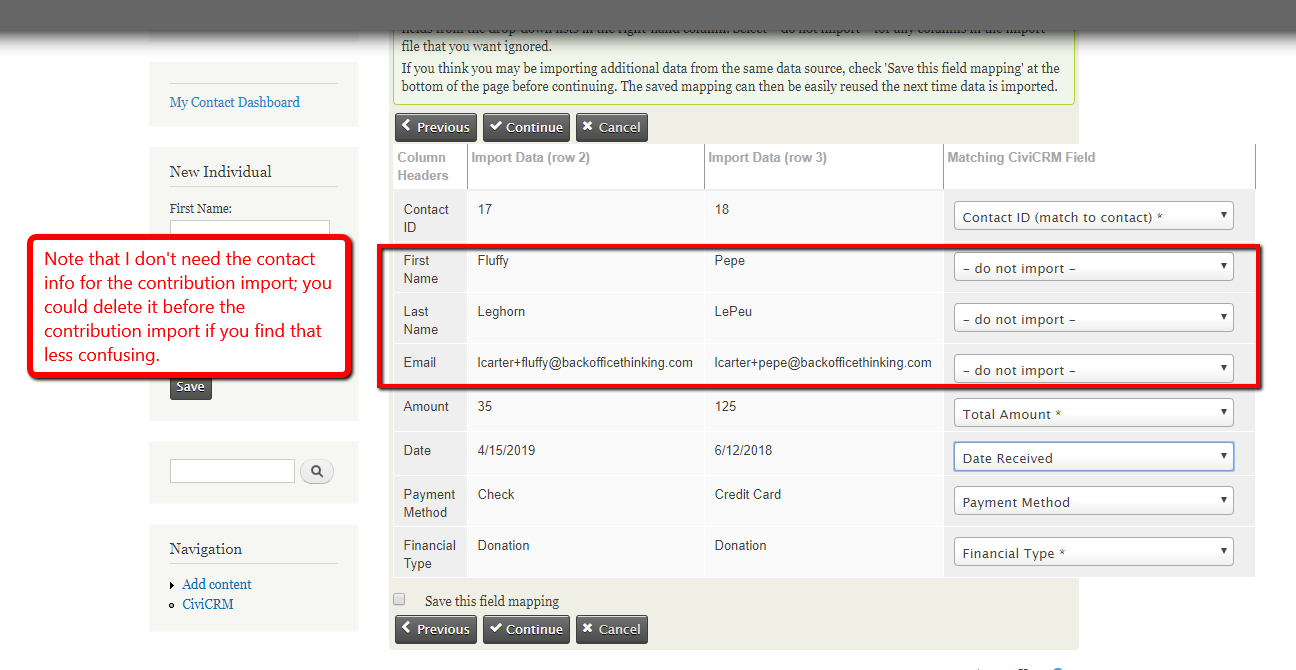
This is what the sample spreadsheet (e.g., contributiondata.csv) looks like:
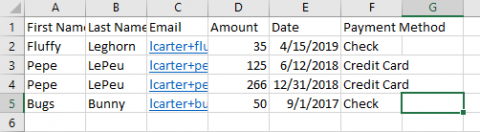
One note on the sample spreadsheet: there’s no financial type indicated. Civi will require this, so be sure you add a financial type for each contribution record before you import.
1) Import contacts into Civi, and tag them so you can easily search for them.
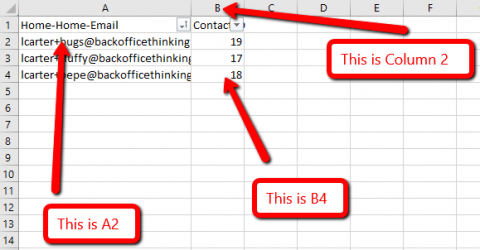
2) Search for contacts with that tag and export them with their Civi ID and their email address (which is the easiest piece of data to use to match them up in Excel). Here’s the export file (e.g., contactexport.csv) - note that we pulled the email address in the first column, and the contact ID in the second column.

3) Copy that export sheet and paste it into a new tab in the file that contains your contribution data (contributiondata.csv).
4) Rearrange the tab with the exported data from Civi so that the email addresses are a) in the first column and b) sorted alphabetically.

5) In your first tab (the one with the contribution data), add a couple of blank columns at the beginning (left) of the sheet.
6) Click in the A column for your first row of contribution data (e.g., in cell A2) and in the Excel menu, go to Formulas > Lookup and References > VLOOKUP.
7) A popup will appear asking for several pieces of data.
8) The cursor will be in the first field, for lookup value - click your mouse in the cell with the email address for row 2 (the cell reference will show up in the VLOOKUP dialog).
9) Click in the next field down (for the Table Array), and then click the tab for the sheet with your Civi data - Excel will add the name of the tab into the Table Array field.
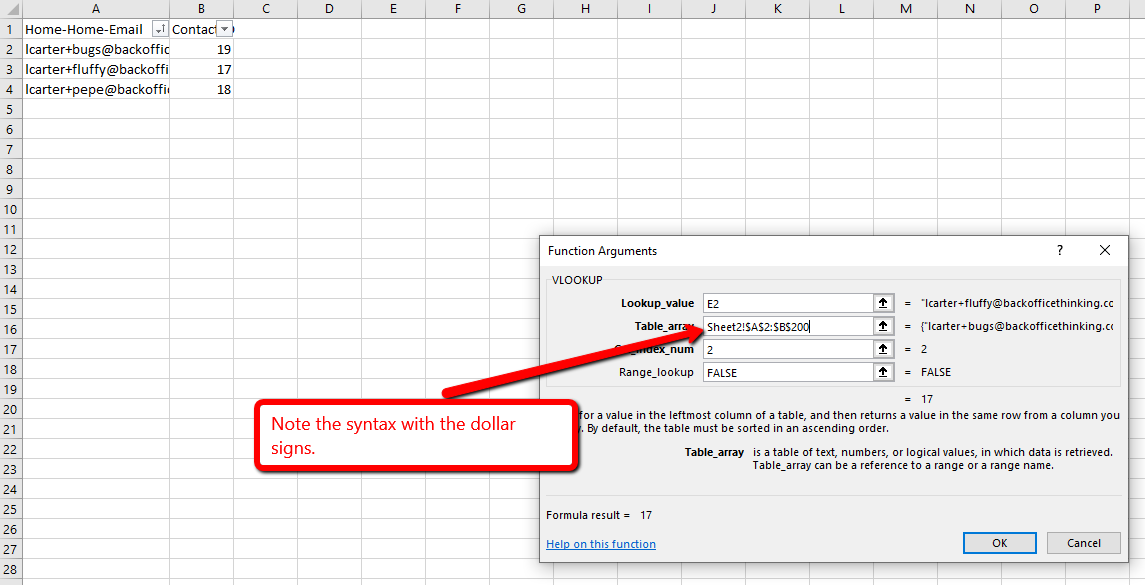
10) In this example, there are two columns of data, one for the Civi ID and one for the email address. You want the VLOOKUP to access both those columns (to check for a matching email, and to pull the Civi ID that goes with it) so you want to pull both columns A and B. If you think from top left to lower right, the data begins at cell A2 and (in this case) ends at cell B4.
We don't always check how many rows we have, especially if it's a large file, so we often guesstimate or use a large number that we know is more than the number of rows we have. Also, when you indicate the table array, you want to ensure that it checks all the data in both columns; by inserting dollar signs, you ensure this works as expected. So, here I might enter $A$2:$B$200 (the colon tells it to go from the A data through the B data, and 200 is far more rows than I need, just to be on the safe side).
11) In the next field, Col_index_num, you're telling Excel which column of data you want to pull into the first tab of your sheet; in this case, we want the Civi ID, which is the second column, so I enter the number 2.
12) For the Range_lookup, you can either set it to TRUE (which will get a close-ish match) or FALSE (which will get an exact match). We always set it to FALSE. Here is the completed dialog box with all of our entries.
13) Click OK; you'll be taken back to your first tab, and you should see the Civi ID (assuming there's a match) populated in the cell. (If there is no match, you'll see #N/A). Copy that cell all the way down the column - you should see the Civi IDs vary by contact from row to row. (If you see all #N/A, you probably have an issue with your VLOOKUP and should try it again.) Copy that column and paste JUST the values into column B. Your file should then look like this:
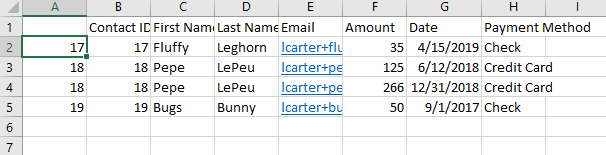
You can then delete column A, save your file as a CSV, and proceed with your contribution import, matching the contact on their Civi ID.
Now your records accurately reflect the latest contributions and you have a process for repeating it next time.
At BackOffice Thinking, we focus on technology so nonprofits can focus on their mission.
Comments
Two other variants on this approach are available to reduce the number of steps:
The CiviCRM CSV Import Helper extension automates the process of matching contributions to a contact ID: https://artfulrobot.github.io/uk.artfulrobot.civicrm.importhelper/
If you need to import contributions and contacts together (instead of ensuring all contacts are imported first), you can use Advanced Import, Form Processor, and the Advanced Import-Form Processor extension together. This is more complex to configure, but requires no coding, and turns even the most complex imports into a short intuitive process for end users.
https://civicrm.stackexchange.com/a/38344/12
Excellent article covering something that always challenges people, thanks!
Thanks Jon, I came here to explain that my CSV Import Helper extension saves you from various VLOOKUP problems, ranging from spreadsheet user error (e.g. forgetting the absolute cell references, the final FALSE option etc.) through to data problems like one email being shared by two contacts; the email in the input data not being the primary one exported later etc. The way it works is that you feed it your CSV, it identifies unique contacts, looks for definite matches, definite not-founds, and maybe matches and asks you what to do for the maybes. It then gives you back your CSV file but with a ContactID column to the correct contact. You can then feed that into any of CiviCRM's normal importer processes confident that you'll match the right contact (as long as you match on contact ID, of course!)
Advanced Import is very useful; I had not thought of pairing it with Form Processor and I can see that would provide a good investment if you have a regular job of importing a certain type of data - e.g. monthly transaction list from external provider. Thanks!