Did you ever dream of a simple and flexible way to get data from CiviCRM shown on a nice interactive map on your WordPress site? Or you need to do this on a remote website different from where your CiviCRM is installed? Or you prefer a map like this that is not using Google Maps? Then you will love the new Leaflet Map / CiviCRM integration plugin by Jaap Jansma. In this blog post I'd like share how to setup a simple map with it in combination with the Data Processor Extension. Here is what it looks like in the end:
1. Installing necessary extensions and plugins
On the CiviCRM side you will need two things:
- a working Geocoding – we like the Geocoder Extension very much for that
- the Data Processor Extension
At WordPress install the following plugins:
- Leaflet Map this plugin integrates LeafletJS with WordPress and enables you to show custom maps e.g. through OpenStreetMap
- Integration between Leaflet Map and CiviCRM
If you‘d like to show your map via remote connection there is a bit more preparation to be done:
Configuration of CiviMcRestFace (optional):
- Install the plugin Connector to CiviCRM with CiviMcRestFace which is doing the exchange between your target website and CiviCRM and is also used by other integrations (e.g. the Caldera Forms CiviCRM integration)
- create a user which should be used as api user for the api connection in your CiviCRM
- create an API key for this user (here‘s a how-to for that)
- limit the permissions for the api user to API access (maybe you need to create a new user role for that)
- go to CiviCRM McRestFace Connections and choose "Remote connection" under CiviCRM Connector
- enter the CiviCRM Rest URL – Important: Normally this URL should be different from the example in the settings: https://my-civi.org/wp-json/civicrm/v3/rest
- Enter your CiviCRM Site Key: you will find it in the civicrm.settings.php
- Enter the API key you created before and save settings
2. Creating a Data Processor
We are now going to create an API entity the Leaflet integration plugin can use to get the data for our partner map. This is going to be easy as we can use the Data Processor for that. Before make sure we have all the data we need:
- add a custom field for contacts containing a select field for the partership levels bronze, silver and gold
- add another custom field for a logo URL (a file would also be possible)
- Make sure you have a couple of contacts with data in these fields and in the geodata fields als well
Now go to Administer → Data Processor → Add Data Processor and follow the next steps:
Create Data Sources
Choose "Add Data Source" and select Contact for source. You can also specify filters as needed, e.g. restrict to a contact type. For our example you chose "Is not empty" for our Partnership level radio select field as we only want contacts having a partnership selected:

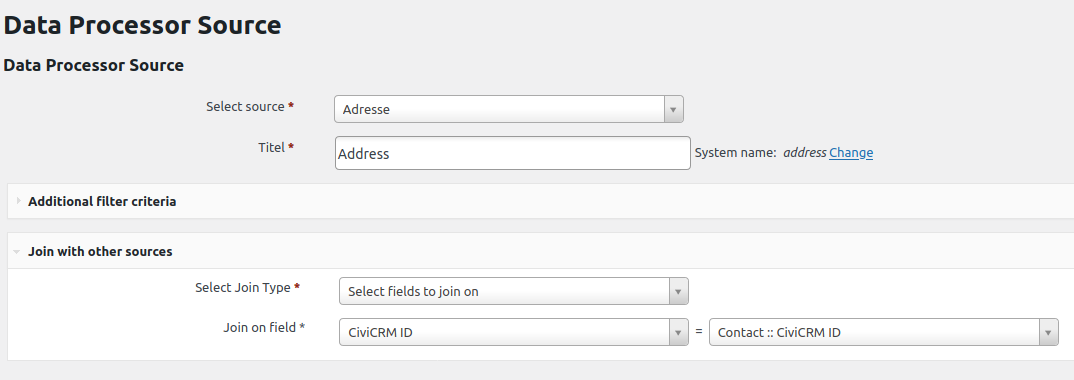
Now we also need the geodata to locate the pins on our maps. This piece of data belongs to the address and that‘s why we need to add a second data source. Tap "Add Data Source" again and chose address this time. Select the Contact ID under "Join with other sources" in the dropdowns for Join on field.
Set Output Fields
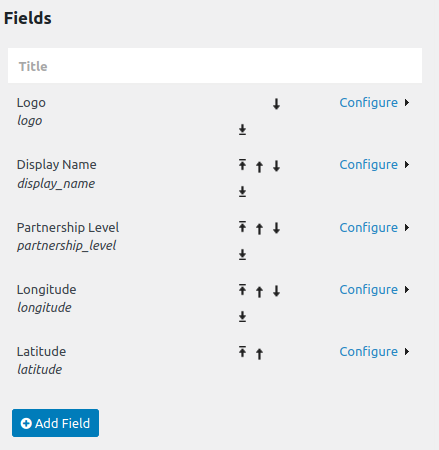
Create the mandatory fields for longitude and latitude with "Add Field" and select "Raw field value" and then ::latitude or ::longitude under field. Make sure you always choose simple and meaningful names as system names as you wil later use these as tokens (sometimes the names automatically generated might be quite long).
Now add the other fields we‘d like to see on our map in the popups:
Create Filters
We want to filter our map by the partnership level so we need to add a Field filter for that field:
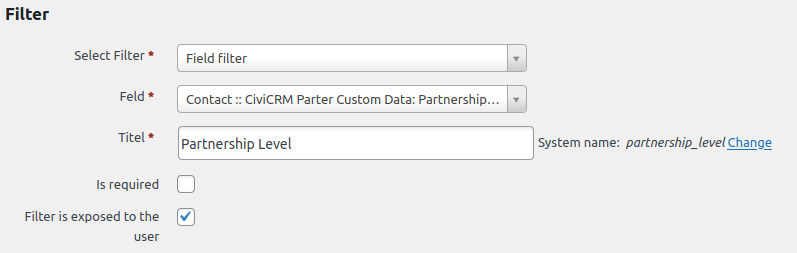
Make sure you have "Filter is exposed to the user" is checked.
Define Output
Add an output of the type API:
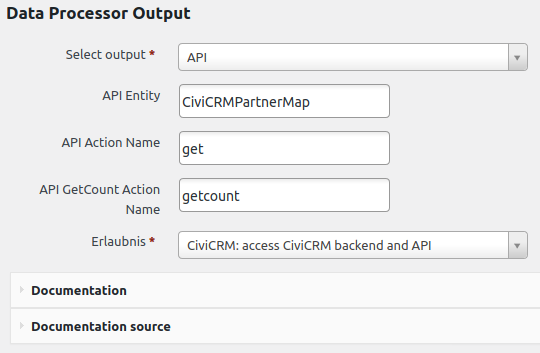
You could now use the API explorer to look what the output CiviCRMPartnerMap is or create another output of the type contact search for that purpose but the CiviCRM part is done now!
3. Creating shortcodes to show the map
Now the only thing left is creating a map and connecting it to the API.
First create a new WordPress site and insert a Leaflet Map plugin shortcode to add the map itself:
[leaflet-map lat=50 lng=12 zoom=6 zoomcontrol !detect-retina]In the Leaflet Map configuration you will find a page called "shortcode helper" which helps you getting the map you need.
Now enter the following shortcode for the Leaflet / CiviCRM integration:
[leaflet-civicrm-api entity=CiviCRMPartnerMap action=get lng_property='longitude' lat_property='latitude' profile=local][/leaflet-civicrm-api]All the tag options used in this last shortcode are required and have the following meanings:
- entity → the API entity you created with the Data Processor
- action → the API action → get
- lng_property → system name for longitude field you chose, here: 'longitude'
- lat_property → system name for longitude field you chose, here: 'latitude'
- profile → If you have installed CiviCRM in the same WordPress site then the profile could be
localotherwise use the name of the CiviMcRestFace connection (see chapter Configuration of CiviMcRestFace above)
If you publish the WordPress site like this the map should already show the pins and the filter should work as well. What is still missing is the popups containing additional information. To get these add the following option to the tag:
popup_text='<img src="{logo}"><br/><strong>Name: </strong>{display_name}<br><strong>Partnership Level: </strong>{partnership_level}'As you can see it simply uses the system names of the Data Processor fields as tags accompanied by some basic HTML tags. The complete shortcodes now:
[leaflet-map lat=50 lng=12 zoom=6 zoomcontrol !detect-retina]
[leaflet-civicrm-api entity=CiviCRMPartnerMap action=get lng_property='longitude' lat_property='latitude' profile=local popup_text='<img src="{logo}"><br/><strong>Name: </strong>{display_name}<br><strong>Partnership Level: </strong>{partnership_level}'][/leaflet-civicrm-api]
That‘s it! Feedback and contributions are welcome.
P.S.
You will find all options for the shortcode tag and other customizations explained here: https://github.com/CiviMRF/integration-civicrm-leaflet
This plugin was funded by CiviCooP, Bundesverband Soziokultur e.V. and Civiservice.de GmbH
You want to see your pin on the map? Become a CiviCRM partner, too ;-)
Comments
Looks amazing!
Just followed that step by step tutorial. Map shows up.. But no pin :-(
Is there something to do after activating the geocoder extension?
How can I debug further? This API outputs the following:
{
"is_error": 0,
"version": 3,
"count": 1,
"values": [
{
"nom_affich_": String,
"longitude": Float,
"latitude": Float
}
]
}
This is fantastic functionality - Thank you for the effort to make these plugins to create a customisable CiviCRM user map.