Do you need to allow parents to register their children? Tired of using custom data fields on a child to collect information about their parents and emergency contacts? Would you like the information collected during the registration to create (or update) the various contact records needed in the back-office? Then this blog post is for you. This recipe creates a contact record for each child, each parent, each emergency contact, the household contact, and also builds the appropriate relationships between each contact.
With the current version of WebForm and WebForm-CiviCRM modules, and some other extensions I am SO EXCITED about youth registration possibilities. The 2 major pain points that I have encountered for youth registration have been solved:
-
Logged in parents can choose an existing child when filling out a WebForm! There is a select list of their children/spouse/partner or other contacts with a permissioned relationship. (Thanks Eileen at Fuzion for the extensions that make this possible!)
-
The admin can configure a different dedup rule for each contact within a WebForm. For example: I use a dedup rule looking for first name, last name, and date of birth for any child contact on the WebForm. (Thanks Coleman Watts!)
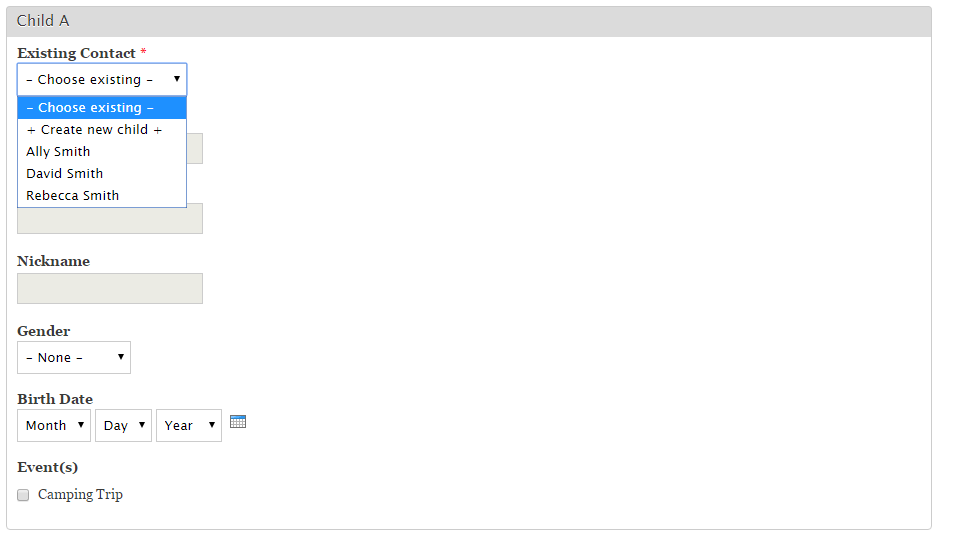
An example of what a logged in user will see when filling out a WebForm:
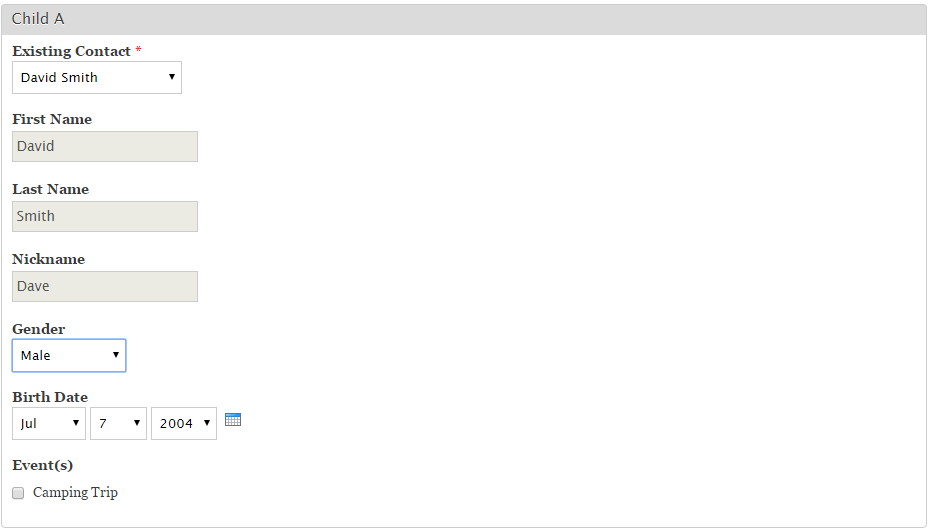
What happens after the parent selects a child (the fields get auto-populated) :
Background:
Since I first started using CiviCRM (way back on version 1.7.x) I have been trying to using it for youth registration. By youth registration, I mean scenarios where a parent needs to enroll one or more of their children for a program, such as nursery school, after school programs, youth camps, youth field trips, and similar.
I originally tried using CiviEvent registration, with very complex profiles for multiple participants. But this proved difficult as there was no good option to collect data about someone who is not a participant (ie the parents and emergency contacts) I have seen this done with custom data fields for the parent’s data, but its a mess in the CRM backoffice, reporting is a hassle, and there is no ability to send email or SMS to the parents, or dedup parents with existing contacts. This is because the parents and emergency adults are not contacts in CiviCRM using that approach.
Then my former consulting practice and a large client generously sponsored the creation of the youth registration native extension for version 4.2 and for its upgrade to 4.3. However, due to many limitations and glitches it was never able to be used in a production environment, and it was never updated for CiviCRM versions higher than 4.3.
Then the WebForm-CiviCRM integration module was improved to work with CiviContribute, so the youth registration extension was formally abandoned in favor of using Drupal WebForms. However, there were still limitations. First, for returning parents they had to fill in info about each child for each and every WebForm submission. This was an inconvenience for the parents who would ask “Didn’t I already send you my children’s information!?!” Second, because WebForm used the default unsupervised dedup rule for all contacts, the form submissions often resulted in a significant number of duplicate contacts, as most children did not have an email address. Or the parent would use the child’s nickname instead of their first name.
With the latest version of the WebForm-CiviCRM module, and some other extensions, these previous issues are solved.
My recipe
Versions of Drupal modules used
-
CiviCRM version 7.x-4.7.7
-
WebForm version 7.x-4.13
-
Webform CiviCRM Integration version 7.x-4.x-dev
Versions of CiviCRM native extensions used
-
Entity Settings Helper Extension (nz.co.fuzion.entitysetting) version 1.2
-
Install this first. This is available via the CiviCRM backoffice “Administer … System Settings … Extensions”
-
-
Related Permissions Extension (nz.co.fuzion.relatedpermissions) version 1.2
-
Install this second, only available to download from GitHub, master branch. See https://github.com/eileenmcnaughton/nz.co.fuzion.relatedpermissions
-
Configuration of WebForm
-
Create or edit a WebForm
-
Click the CiviCRM tab for the WebForm.
-
Add multiple CRM contacts in the usual way to the WebForm. (I named mine Main Parent, Other Parent/Adult, Child A, Child B, Child C)
-
Optional: add various CRM fields and CRM custom fields to each contact. In my screen prints, I used nick name, gender and date of birth for each child.
-
For each child contact, check the box to include “Existing Contact” (see screen print attached to this blog post)
-
Optional, but strongly recommended: For each child contact, add 2 relationships for each child: Add the "child of" relationship to each adult in the WebForm. (Also check the box to make sure the parent gets permission to their child.) This step will mean returning parents will see their children in the "existing contacts" select list when they fill out some other WebForm. It also means your back-office users can get reports on which kids belong to which adults.
-
Click “Save”
-
Click the “WEBFORM” tab
-
Scroll to find the “Existing Contact” field for Child A, then click the “edit” link for that field.
-
Change the “Form Widget” to “select list” (see screen print attached to this blog post)
-
Repeat steps 9 and 10 for each contact in the WebForm.
-
(Optional) On the left side, look for the "CiviEvent" area, and click it. From here, add one or more events to this webform. (Can be free or paid events or both. If offering any paid events, make sure to do step 13.)
-
(Optional) On the left side, look for the "CiviContribute" area, and click it. From there add a ContributionPage to this webform. You can offer "Pay later", "credit card" or both. You must use on-site style payment processor, such as Authorize.net, PayPal Pro, etc.
Challenges
Even with my current high level of excitement, some challenges remain:
-
Any contributions created from a WebForm end up with a single financial type per WebForm event or membership. There is no ability to use pricesets or the feature of having a single contribution with different financial types for each line item. (Each paid thing on the webform ie an event, a membership ends up as one line item.)
-
The parent has to choose between "pay later" or paying in full. There is no option to pay a deposit.
-
There is no version of the needed Drupal modules listed in this recipe for Drupal 8 yet.
My solution to these challenges has been to hyperlink to a regular CiviContribution page to deal with all the financial matters. Since its not embedded within the WebForm, I can use pricesets, pledges, various financial types, etc. Normally I put the hyperlink to the payment page on the thank-you page of the WebForm.
Hope to hear how this works for your environments.
-Sarah Gladstone
info@fountaintribe.com
Comments
I think this will help a lot of people
Great recipe. I also recommend the webform_layout module for allowing visual tweaks like putting first & last name fields side-by-side.
We use civicrm for summercamps for some 5 years now and are still doing it the 'old' way. How do you connect the contribution and the event registration? And how do you format the payment link in the confirmation mail?
We use civicrm for summercamps for some 5 years now and are still doing it the 'old' way. In this recipe, how do you connect the contribution and the event registration? And how do you format the payment link in the confirmation mail?
When you are editing your webform, do the following:
1) Click on the "CiviCRM" tab
2) On the left side, look for the "CiviEvent" area, and click it. From here, add one or more events to this webform. (Can be free or paid events or both)
3) On the left side, look for the "CiviContribute" area, and click it. From there add a ContributionPage to this webform.(Can offer "Pay later", "credit card" or both. (Must use on-site type payment processor, ie like Authorize.net, PayPal Pro, etc)
Thanks for the post. This is exactly what Camp Cooinda implemented for our first online summer camp applications last year and we'll be shortly launching the same forms for this (southern hemisphere) summer.
We've also recently engaged Agileware to develop a custom reporting template to make it much easier to generate reports with parent and child contact and participant details all in one easy to run report. We punch that out via csv files into Word Mail Merge and into double-sided A4 sheet with all the info we need about each camper on our programs. We would be happy to share this report template with others.
I am looking forward to trying the extension that you are implementing.
Have you tried the custom searches and reports in these 2 extensions:
https://civicrm.org/extensions/family-friendly
https://civicrm.org/extensions/event-helper
I am looking forward to trying the extension that you are implementing.
Have you tried the custom searches and reports in these 2 extensions:
https://civicrm.org/extensions/family-friendly
https://civicrm.org/extensions/event-helper
Just saw that you can redirect the confirmation page of the webform submission so that it goes directly to the contribution page for payment. Gives it a more seamless look.
It has been a couple years since this post. Is this still the best solution for allowing someone to register another person for an event?